Relaxation can be a real catch-22 for people with arthritis. The nervous system is where pain signals occur, so relaxing the body can help reduce pain. But because having arthritis can lead to a hyper-aroused nervous system, it can sometimes be difficult for someone with arthritis to release the tension that results from chronic pain.
That’s where restorative yoga, which supports the body in a gentle position with soft, well-placed cushions, comes in. “Restorative poses allow the body to truly let go,” says yoga researcher and therapist Steffany Moonaz, PhD, who created this restorative sequence for the new book Yoga Therapy for Arthritis (Singing Dragon), written with psychotherapist Erin Byron, cofounder of one of the first internationally accredited yoga therapist training programs.
As you move through this restorative yoga sequence, encourage your body to release and rely on the support beneath it. You can think of this action as a metaphor for life, Dr. Moonaz says. Are there places in life where you can sink into the support that’s available to you? Are there friends and family whose support you resist? Community resources you haven’t accessed? Assistive devices you could utilize more frequently?
“Noticing how you’re able to sink into postures, and also when you resist letting go, may provide some insight into other areas of your life,” says Dr. Moonaz, who’s also the director of clinical and academic research at the Maryland University of Integrative Health.
Dos and Don’ts for Yoga for Arthritis
Do pay attention to your breath. While dedicated breathing practices often happen at the beginning or end of a yoga class, you should mindfully engage your breath throughout any yoga practice. For this restorative practice, let the inhale take care of itself and focus on elongating the exhale — doing so helps engage the relaxation response. You may notice various thoughts and emotions pass; simply breathe them away on that long exhale. In this way, your mind is supported by the breath just as your body is supported by the props.
Don’t rush. Stay in each pose for five to 10 minutes, giving yourself ample time to genuinely drop into it. These restorative postures are useful any time you feel worn out. You can practice them in bed to ease yourself into your day and to help bring sleep at night. If you don’t have much time, it’s okay to rest in just one or two of these postures and bask in a place of ease.
Do experiment to find what works for you. “If a restorative pose isn’t comfortable, you just haven’t found the right variation yet,” says Dr. Moonaz.“It can take some playing around, but when you find it, you should feel ease in the body and the ability to let to.”
Restorative Yoga Moves for Arthritis
1. Forward Bend
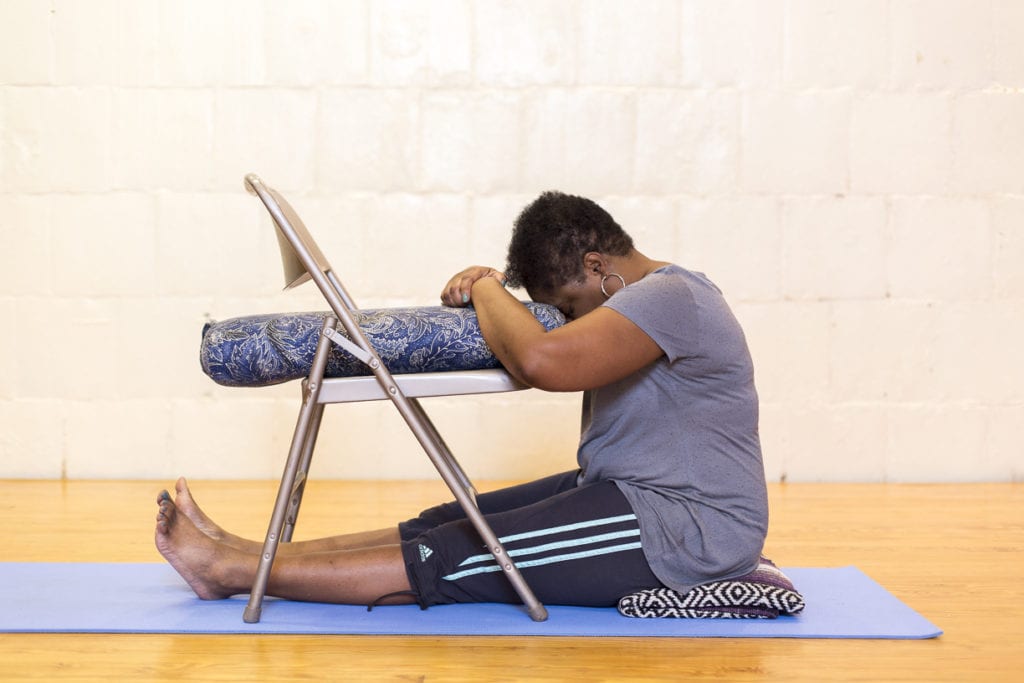
Prepare: If you can comfortably come to the floor, sit down facing a chair with pillows and/or blankets handy. You may want to sit up on some cushions in order to avoid discomfort in the lower back. You can widen your legs so they extend on either side of the chair and, if needed, place a rolled towel under your knees for support.
Purpose: Lean forward so your forehead rests on the chair. You might rest your forehead on the back of your hands or place a cushion on the chair for softness. You can also do this sitting in a chair with your forehead resting on a pillow against the wall. The intentional attitude of a forward fold is to surrender, to be grounded without effort. You can try any other variations on a forward bend, but this shouldn’t be a stretching pose. It’s a pose for letting go. Use the props to play around and support any parts of the body that need it. Allow yourself to melt into that support.
2. Side Bend
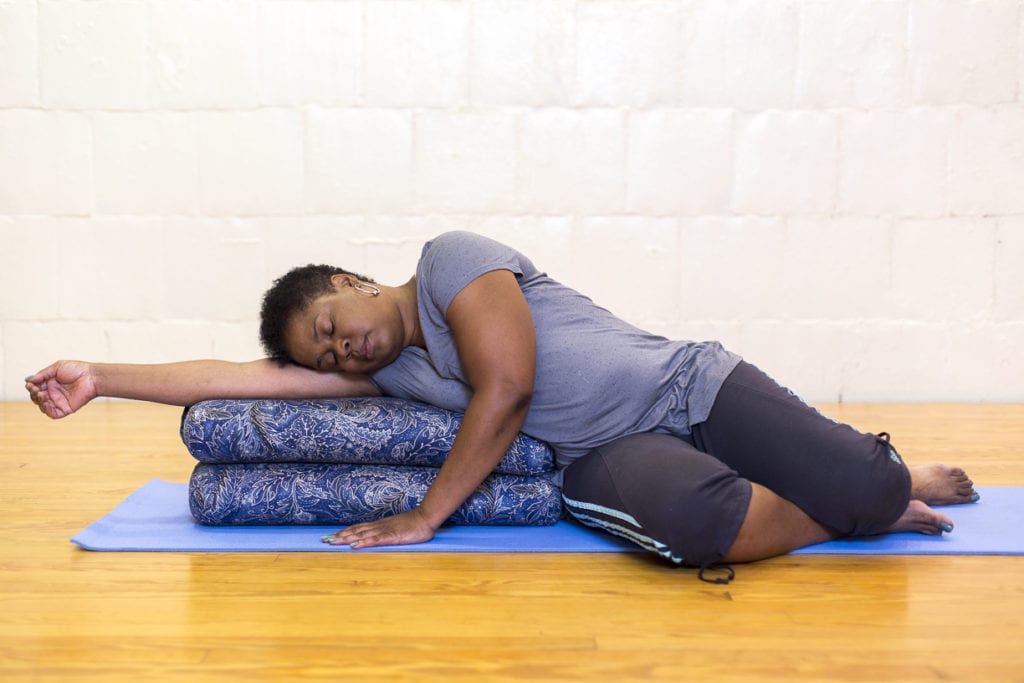
Prepare: This can be easily done lying in bed. The idea is to have a slight lateral curve in the spine while lying on one side to energetically open the side body. You may want to have a pillow between your knees (so your thighs can be parallel to each other), underneath your head so your neck is properly aligned, and under your ribcage.
Purpose: This positioning will allow for a slight side bend. Again, it should not feel like a big stretch and you should be able to let the body relax into this support. You may have the upper arm overhead alongside the ear or resting on a cushion in front of you. After a few minutes, roll to the other side to repeat the posture there. You may notice that the two sides feel differently and that you need slightly different support on the second side. We’re all asymmetrical, so see if you can notice and respond to that difference with curiosity, not concern. Enjoy breathing into the open side of your body.
3. Back Bend
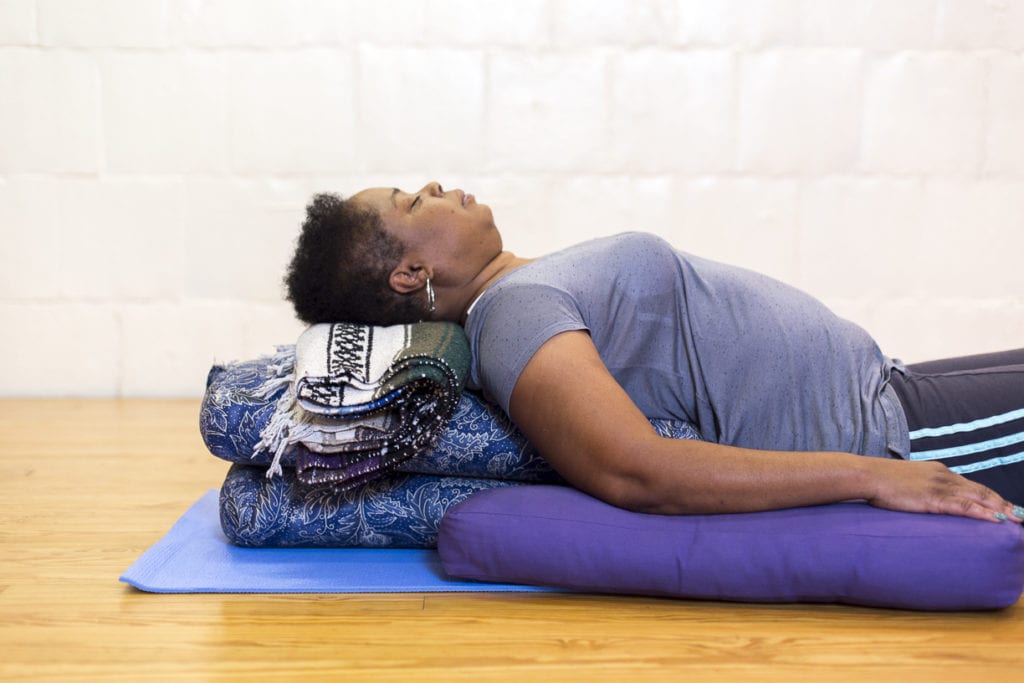
Prepare: This pose will be done lying on your back, either on the floor or bed. You’ll probably want a pillow or other support under the knees to alleviate any pressure on your lower back. Additionally, place a pillow or other support under your back, from your hips to your armpits. If this isn’t comfortable, you might try rolling a large towel and placing it directly along your spine from tailbone to head. Be sure to support any parts of the body that need it. You may also want to be covered with a blanket to feel protected and secure.
Purpose: You should feel an opening in the chest, heart, and front of the torso. Notice the space this creates for the inhale, as you continue to prolong the exhale.
4. Twist
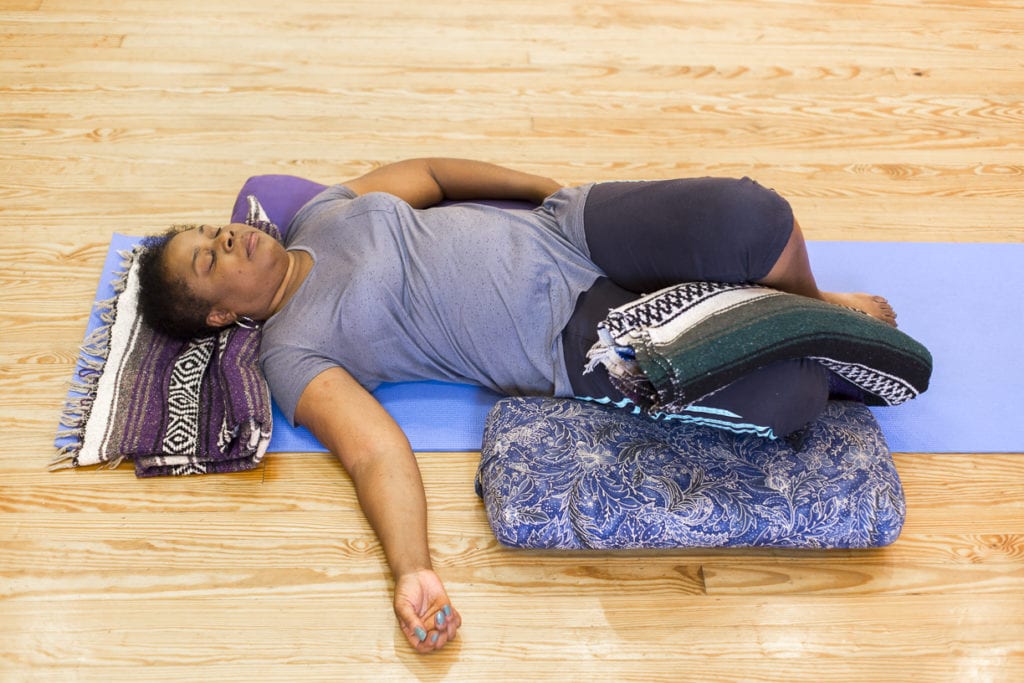
Prepare: Remove any props from under your body so you’re lying on your back with a pillow or other support on your left side. Draw your right knee in toward your chest and then let it fall across your body to rest on the left pillow. You can bring some support under the right shoulder, which may have lifted off the floor. Consider any other parts of your body that aren’t able to fully relax and put a blanket, cushion, or block beneath them. You may even want more support under your right leg.
Purpose: This should feel like a gentle twist through the whole spine. After a few minutes, roll onto your back and rock side to side a few times before moving into the posture on your other side.
5. Supported Savasana
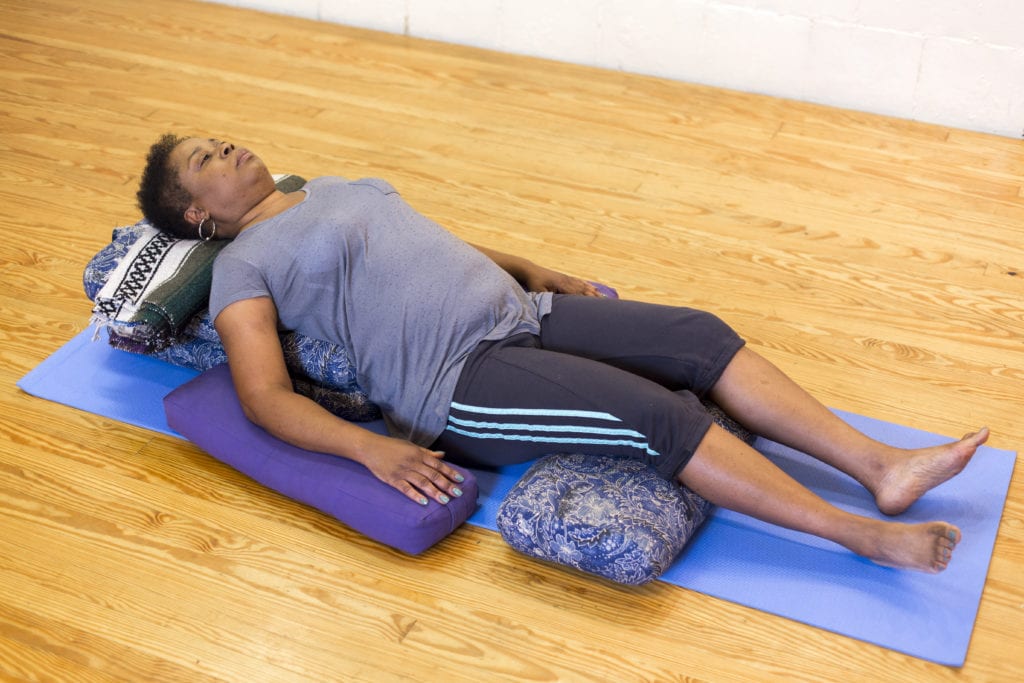
Prepare: Lie on your back with a cushion beneath the knees to take pressure off your lower back. You may also want a small rolled towel beneath the natural curve in your neck. You may add some other form of weight that helps you feel more present, supported, or grounded, such as a blanket over your whole body, a cushion on your torso, or props over your upturned palms.
Purpose: Feel all the points of connection and allow that feeling to deepen as you rest and release down. Remain in this posture and focus on the surface beneath you. Feel the resistance as you inhale, inflating the lungs and creating pressure against the bed or floor. Feel the release as you exhale. Allow each exhale to be a little longer than the last as you continue to release and relax. When you’re ready to come out of the posture, gently roll on your side, then use your hands and arms to help you return to a seated position, carrying the sense of being supported with you. Take a few breaths to acknowledge the relaxation and freedom the practice created.